Automation
- Why Migrate from BigCommerce to Shopify?What Can Be Migrated Natively From BigCommerce to Shopify?
- 1. Products2. Customers3. Orders4. Discounts & Gift Cards5. Store ContentWhat Cannot Be Migrated NativelyHow to Migrate BigCommerce to Shopify: Step-by-Step Tutorial
- Method 1: Migrate BigCommerce to Shopify ManuallyMethod 2: Using a Third-Party Migration App (e.g. Cart2Cart, LitExtension, Matrixify)Method 3: Hire a Developer or AgencySo, Which Method is Best For You?BigCommerce to Shopify Migration: Post-Migration ChecklistBigCommerce to Shopify Migration: Troubleshooting Your Common Problems
- Common Import Issues
If you’re considering migrating your store from BigCommerce to Shopify, you’re already thinking ahead — and that’s a great start.
Migrating your store is a big move, and there’s no one-size-fits-all method. The best migration option for you depends on your time, budget, and technical expertise. In this guide, we’ll break down your four main options for migration — from free DIY methods to fully managed solutions — including the pros and cons of each.
Why Migrate from BigCommerce to Shopify?
There are several compelling reasons why store owners choose to migrate BigCommerce to Shopify or transfer their BigCommerce store to Shopify. Here are 5 common motivations behind this ecommerce migration and platform replatforming decision:
- Ease of Use: Shopify is well known for its ease of use in setup, configuration, product configuration, and order management, which can make it easier for non-technical users to build and manage their online store.
- Greater Flexibility: When you migrate your store to Shopify, you gain more flexibility in design customizations, allowing you to create a unique online presence that matches your branding style and stands out from competitors. Shopify Plus offers even more customization options for enterprise-level businesses.
- App Integrations: Shopify has a broader selection of third-party apps that flawlessly integrate with your Shopify store, providing additional features and functionality for selling online. This online store management advantage makes daily operations smoother after migration.
- Better Customer Support: Shopify offers 24/7 support via phone calls, live chat, and email to help you resolve any issues that might arise when you move BigCommerce to Shopify.
- More Accessible Security: Shopify offers a comprehensive set of security tools, such as SSL encryption, PCI compliance, two-factor authentication, and fraud detection.
Exclusive Offer: Get Shopify 33 days for just $1 + The Online Store Starter Kit
Start your 3-day free trial, and enjoy your first month of Shopify for $1 plus the premium package designed especially for new Shopify merchants!
What Can Be Migrated Natively From BigCommerce to Shopify?
When migrating from BigCommerce to Shopify, the data that can be transferred directly without third-party apps or complex custom coding is somewhat limited. However, Shopify provides tools and guidelines to help migrate core data. Here’s a breakdown of what can be migrated natively:

1. Products
- Product titles, descriptions, pricing
- SKU, weight, and inventory
- Product images
- Variants (like size, color)
- Product categories (may require manual adjustment to Shopify “Collections”)
Limitations:
- Custom product fields may not migrate perfectly
- Product URLs and SEO data may need manual updating
2. Customers
- Customer names and emails
- Shipping and billing addresses
- Order history (only basic data unless using app or CSV import)
Limitations:
- Passwords cannot be migrated due to encryption: Customers will need to reset their passwords
3. Orders
- Basic order information (order ID, products purchased, customer info, totals)
- Order statuses (can be imported with limitations)
Limitations:
- Full order histories or payment details may need app-based help
- Refunds, shipping, and tax data might not fully carry over
4. Discounts & Gift Cards
- Only manually recreated on Shopify
- BigCommerce discounts won’t auto-transfer
5. Store Content
- Pages (e.g., About Us, Contact, etc.) can be copy-pasted or recreated manually
- Blog posts can be exported and re-imported using CSV or blog importer tools
What Cannot Be Migrated Natively
- Store theme and design (must be recreated)
- Apps and their data (manual setup needed)
- Advanced custom fields or BigCommerce-specific settings
- Customer passwords
- Automated email workflows
How to Migrate BigCommerce to Shopify: Step-by-Step Tutorial
If you’re wondering “how do I move my store to Shopify?” you’re in the right place. Below is our detailed tutorial on how to migrate BigCommerce to Shopify step by step. These steps to migrate BigCommerce to Shopify will guide you through the entire platform replatforming process, from initial Shopify store setup to the final launch. Below is our detailed step-by-step guide for migrating from BigCommerce to Shopify.
Method 1: Migrate BigCommerce to Shopify Manually
Step 1: Set Up Your Shopify Store
The very first thing you need to do when migrating from BigCommerce to Shopify is to set up your Shopify store, particularly if you’re new to the platform. This involves getting everything ready, from storefronts to necessary app integrations.
Here are the steps to set up a Shopify store:
Sign up for a Shopify account
To get started with setting up your Shopify store, you can sign up for a Shopify free trial, which lasts 3 days, by going to Shopify.com and clicking the “Start free trial” button. You will need to provide some basic information about your business, such as your name, email, and business name.
After you are signed up, you will be taken to your Shopify admin dashboard, where you can start setting up your Shopify store and adding products.
Fine-tune your shopify store
Once you have signed up for Shopify, the next step is to personalize your Shopify store to match your brand’s unique style.
Shopify is making this process much easier with its built-in drag-and-drop editor, which allows you to customize every aspect of your store, from adding templates and images to creating product categories and main pages.Configure Your Store’s Settings
Once finished with the visual design of your store, your next step is to configure its settings. This process involves several important tasks, such as setting up shipping zones and rates, specifying tax rates and rules, setting up payment gateways, connecting a domain, and integrating with Shopify apps.
Subscribe to a Shopify Pricing Plan
When you finish setting up your Shopify store, it’s time to commit to a Shopify plan. By paying monthly for one of the three main Shopify pricing plans (Basic, Shopify, and Advanced), you can take advantage of a special deal where you only pay $1 per month for the first three months.
For a more detailed guide on starting a Shopify store, check out our ultimate guide here, which provides comprehensive step-by-step instructions on everything you need to know to get your store up and running.
Step 2: Export Data from BigCommerce
Now that your storefront is ready and you have chosen a pricing plan, the next step is to start exporting your data from your BigCommerce store.
It’s worth noting that while exporting data from BigCommerce, you will be prompted to choose an export template, which determines the fields that will be included in the export. BigCommerce recommends using the Default template to export orders and the Bulk Edit template to export products and customers.
Exporting Products from BigCommerce
To export BigCommerce products:
- Go to Products from your BigCommerce admin

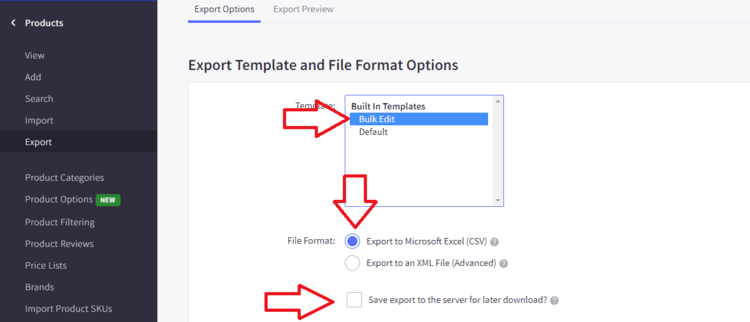
- Select “Export” from the pull-down menu. On the next screen, select your export settings:
- Export template – Bulk Edit template for exporting products.
- File format – CSV
- Save export to the server for later download – Enable this option if you export more than 1000 products
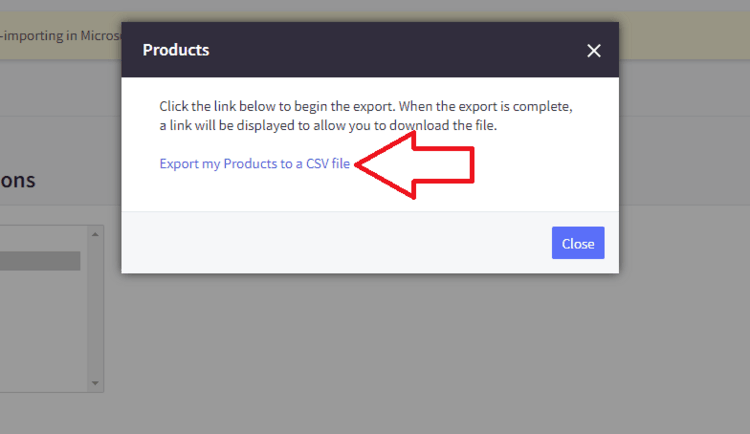
- Click “Continue” and select “Export my Products to a CSV file.“
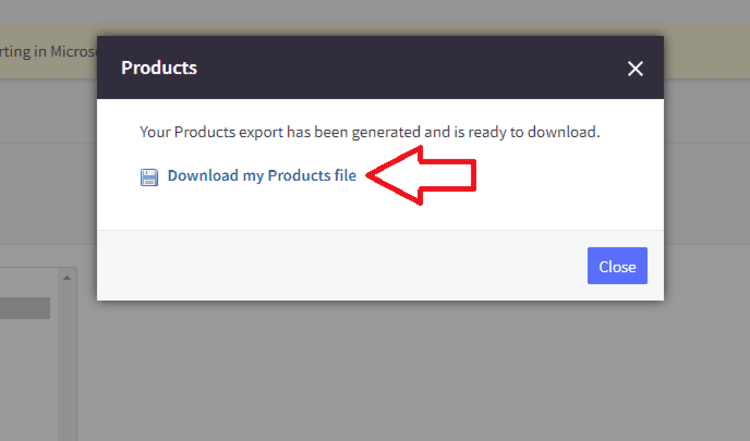
- Once done, click the Download my Products file option to save the file to your computer.
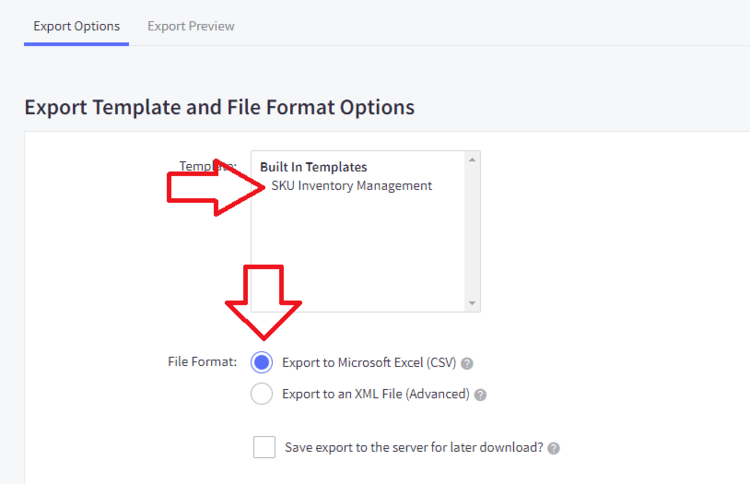
Exporting Product SKUs
You can just export your product SKUs from your BigCommerce store. Here are the steps:
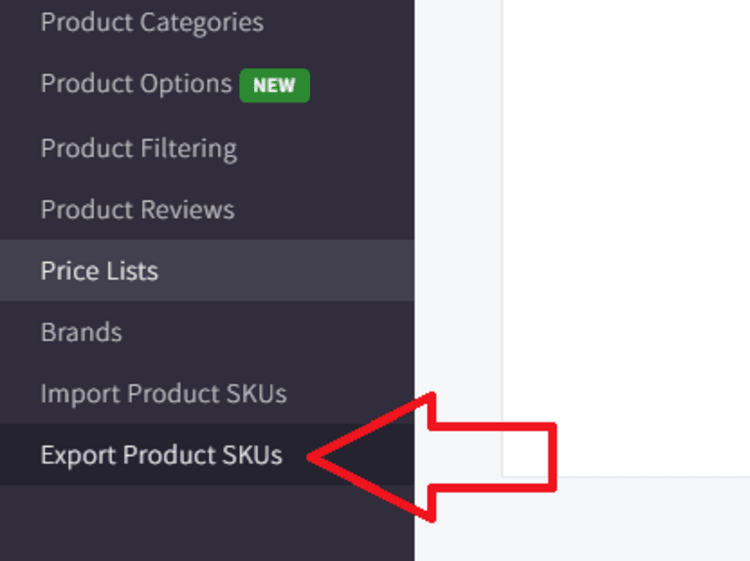
- Select “Export Product SKUs” at the bottom of the left-side menu.
- Select “SKU Inventory Management” as your export template and CSV as your file format.
- Click “Continue” and select “Export my SKUs to a CSV file” to save your CVS file to your computer.
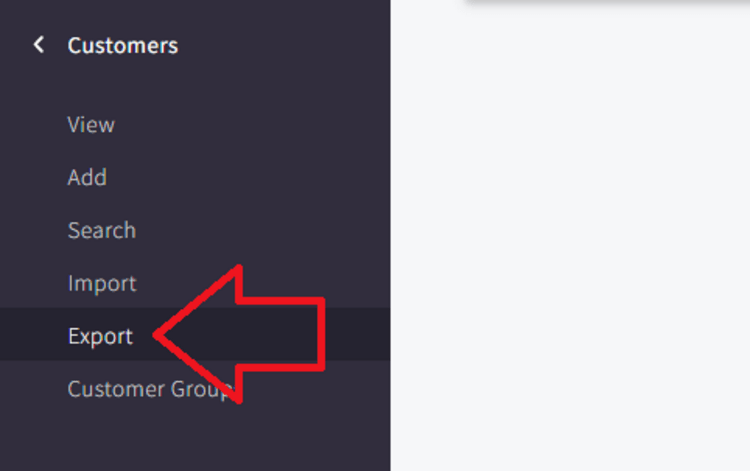
Exporting Customers
To export customers from your BigCommerce store:
- Go to Customers from your BigCommerce admin and select Export from the drop-down menu.
- Select your export settings
- Select the Bulk Edit template for exporting customer data
- Select “Export to Microsoft Excel (CSV)“
- (Optional) Check the box next to “Save export to the server for later download.“
- Click “Continue” and hit “Export my customers to a CSV file.“
- Click the download link to save the file to your computer.
Note: Customer passwords cannot be exported into a CSV file. Customers will need to create new passwords when logging into their accounts on your new Shopify store.
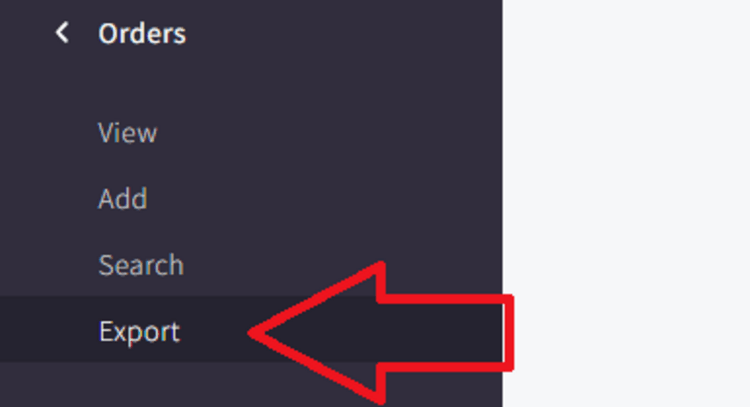
Exporting Orders from BigCommerce
To export orders from BigCommerce:
- Select “Orders” from the left-side menu and select “Export Orders.”
- Select your export settings:
- Template: Default
- File format: CSV
- Enable Save export to the server for later download (optional).
- Click “Continue” and click “Export my orders to a CSV file.”
- Click “Download my Orders file.“
Step 3: Import Data into Shopify
Once you have successfully exported your data from your BigCommerce store, the next step is to import it into Shopify. You can do this by manually importing your data into Shopify using the CSV files that you extracted from your BigCommerce store earlier.
It’s worth noting that Shopify has its own CSV template for importing data into its platform, so it is crucial to ensure that your CSV files follow the same format.
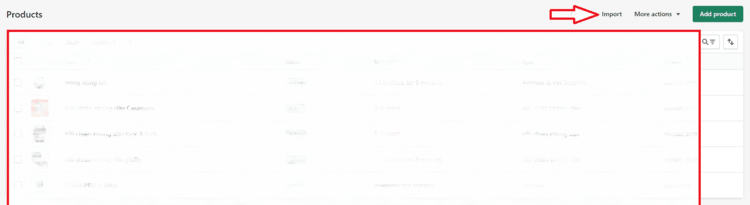
Importing Products into Shopify
To import products into Shopify:
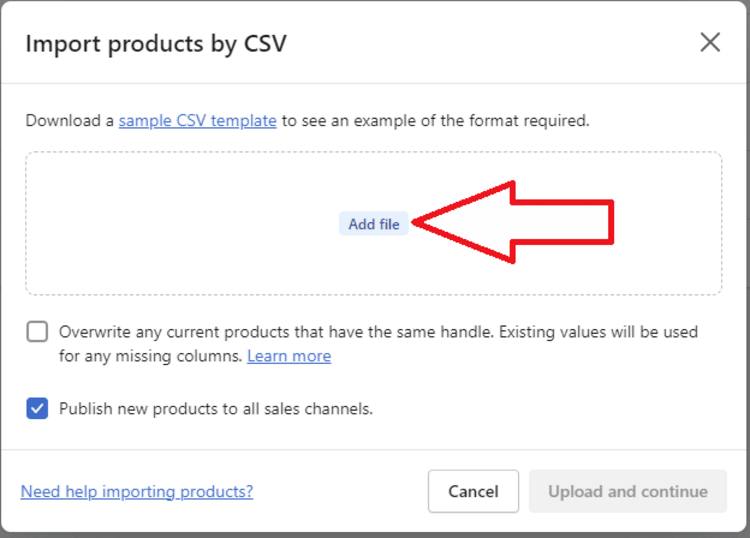
- Go to Products from your Shopify admin and select the Import option at the top of the screen.
- Click “Add File” and select the “CSV file” that contains the product data you obtained earlier.
- You can choose to enable the “Publish new products to all sales channels” option if you want to publish your products to all of your sales channels. Otherwise, uncheck it.
- Click “Upload and continue.“
- Review your data and confirm your action by clicking “Import products.“
- Once the upload process is complete, you will receive an email notification sent to the email address associated with your Shopify store.
Importing Customer Data into Shopify
To import customers into Shopify:
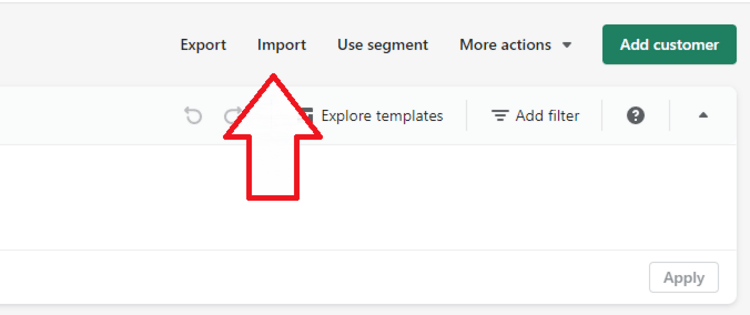
- Select “Customers” from the left menu within your Shopify admin
- Click on the “Import option” at the top right
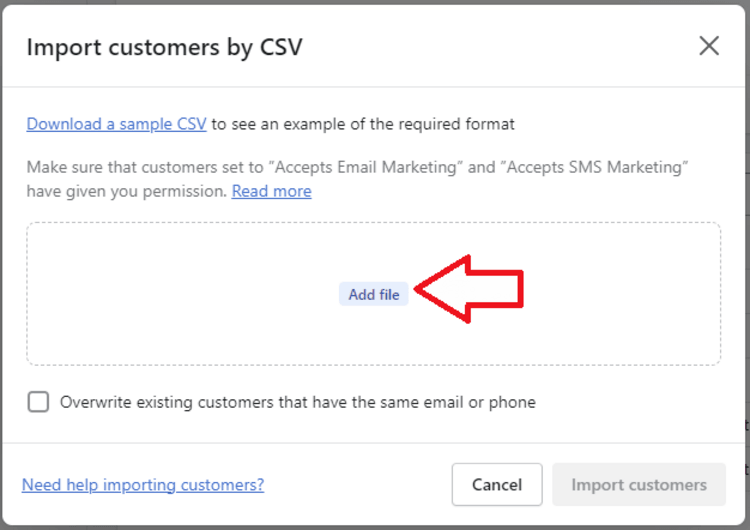
- Click “Add file” to select the CSV file that contains your customer data.
- Enable the “Overwrite existing customers that have the same email or phone” option if necessary and click the “Import customers” button.
Importing Orders into Shopify
Importing products and customers into Shopify is a straightforward process, but when it comes to importing orders, it can be more complicated.
To import orders from BigCommerce to Shopify, you can use the Transporter app, which is available for Shopify Plus users only. This app allows you to migrate online stores from other platforms to Shopify.
Step 4: Transfer Your BigCommerce Domain to Shopify
Now that your product and customer data have been successfully migrated to Shopify, the next step is to transfer your domain to Shopify.
To transfer your BigCommerce domain to a different platform, you first need to unlock it. Here are the steps to follow:
- Log into your BigCommerce Account Dashboard and click Domains.
- Click “Manage” next to the domain you want to unlock for transfer.
- Scroll down until you see the Registrar Lock section and uncheck the option next to the “Yes, enable the domain registrar lock on my (your domain)” option.
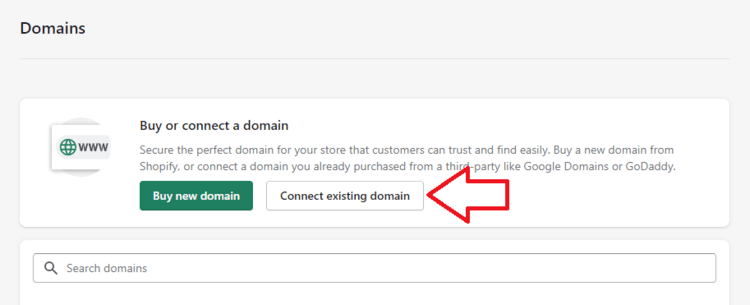
- Now, go to your Shopify admin, and select Settings > Domains.
- Click “Connect existing domain.“
- Enter the domain you want to connect to and hit the “Next” button.
- Shopify will verify your domain, which may take up to 48 hours.
If you do not wish to connect your existing domain to Shopify, you have the option to purchase a new domain name directly from Shopify. Domains bought through Shopify can be managed within the Shopify admin.
Step 5: Create URL Redirects
After successfully transferring your BigCommerce domain to Shopify, you can create URL redirects for old URLs to ensure that visitors who go to the old pages are redirected to the new pages.
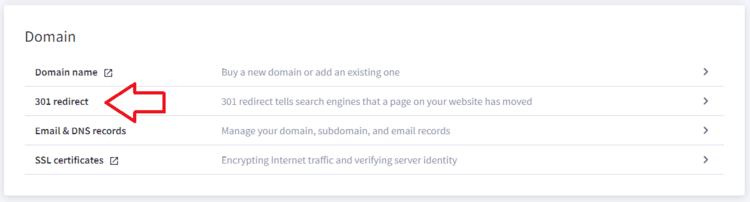
To create 301 redirects:
- Go to Settings from your BigCommerce admin and select “301 redirect” under the Domain section.
- Under the Old URL section, type in the URL of the page you want to redirect from.
- Select how you want to create your 301 redirects:
- Manual redirects: Enter the new URL you want to create a redirect to in the empty field under the New URL section.
- Dynamic redirects: Click the link that says Click here to choose a product, category, brand, or web page. Then, select the page you want to redirect to from the pop-up > Insert Link.
Step 6: Inform Your Subscribers About Re-platforming
After you have migrated your customer data and set up URL redirects for your old URLs, you can inform your loyal customers about the re-platforming process.
You can send them emails or create a blog post on your website explaining the changes and what they can expect from the Shopify platform. In addition, it’s important to inform them about the launch day of the new site and invite them to create accounts and passwords on your new site.
If you have a large number of customers, you can use Shopify’s mailing service called “Shopify Emails” or choose from various apps available on the Shopify App Store to send your emails.
Step 7: Place Some Test Orders
After informing your customers about the platform change, placing some test orders is a good idea to ensure the transaction process works properly.
These test orders should include completing both successful and failed transactions, refunding and canceling an order, fulfilling or partially fulfilling an order, and archiving a successful order.
Step 8: Train Your Staff Members
When re-platforming from BigCommerce to Shopify, it’s essential to involve your staff in the transition process. They should be informed about the platform change and trained on how to use Shopify’s interfaces and features.
In addition, you can assign roles and permissions to each team member based on their responsibilities.
Step 9: Launch Your Shopify Store
When everything is ready, it is time to officially launch your new online store. After launch, keep track of customer feedback to ensure that your customers are satisfied with the new platform.
Method 2: Using a Third-Party Migration App (e.g. Cart2Cart, LitExtension, Matrixify)
Step 1: Choose a Tool
In my article, we will mention the Cart2Cart tool for migrating BigCommerce to Shopify. Sign up for an account. Choose BigCommerce as the source cart and Shopify as the target cart.

Step 2: Connect Your Stores
- For BigCommerce: Provide store URL and API credentials
- For Shopify: Provide your new Shopify store URL and API key (generated in Shopify admin)
Step 3: Choose What to Migrate
- Select the data you want to transfer: products, orders, customers, categories, SEO URLs, reviews, blog posts, etc.

- Most tools offer optional features like: Preserving order IDs; Creating 301 redirects
Step 4: Run a Demo Migration
Start with a demo migration to preview how your data will appear in Shopify. Check for issues with product structure, variants, and formatting. Make changes if needed before launching the full migration.
Step 5: Launch Full Migration
Once you’re satisfied with the demo, proceed with the full migration. Depending on your store size, this may take anywhere from a few minutes to a few hours. Tools usually allow you to pause, resume, or re-run the process if needed.
Step 6: Post-Migration Review
After migration, check your store thoroughly. Review product listings, categories, customer data, and order history. Ensure redirects work, SEO settings have carried over, and your storefront functions correctly.
Notes
- Ideal balance between automation and control
- You pay per record or volume, but save time and reduce risks
- Excellent for non-technical users with larger stores
Method 3: Hire a Developer or Agency
Step 1: Define Your Requirements
Start by listing what you want to migrate — from products and customer records to SEO data and custom functionalities. Decide if you also need storefront design, integrations, or post-launch support.
Step 2: Choose the Right Partner
Look for a certified Shopify Partner or Expert with experience in BigCommerce migrations. Review their portfolio, testimonials, and ask about timelines, pricing, and warranty support.
Step 3: Scope the Project
Once you select a partner, define the scope together. This includes what data will be transferred, how long it will take, pricing details, and any guarantees. Make sure the proposal covers SEO preservation and a post-migration support period.
Step 4: Let Them Handle the Migration
Your developer or agency will export your BigCommerce data, clean and format it, and import it into Shopify. They’ll also design or customize your storefront and set up necessary SEO redirects.
Step 5: Review and Finalize
Before launch, thoroughly test your new store: review product pages, check customer and order records, test the checkout process, and verify SEO and mobile responsiveness. Share feedback to fix anything that’s not quite right.
Notes
This is the most comprehensive — and expensive — option, but it’s ideal if you’re short on time or want expert handling from start to finish. Great for complex migrations or if your brand needs a custom Shopify setup.
So, Which Method is Best For You?
Determining which method to use for the migration depends on your business size, budget, and the amount of data you want to transfer.
- Manual migration is a suitable option for small or medium-sized businesses with limited product data.
- On the other hand, third-party migration services like Matrixify BigCommerce to Shopify migration are a better fit for businesses with complex product data and a larger customer base.
BigCommerce to Shopify Migration: Post-Migration Checklist
For your new website to run smoothly after launch, it’s a good idea to have a plan in place for ongoing maintenance and updates. This includes:
- Regular checking and fixing of technical issues.
- Updating of website content and product offerings.
- Implementation of new features or integrations.
- Regular analysis of website performance and user experience.
- Keeping up-to-date with the latest industry trends and best practices.
BigCommerce to Shopify Migration: Troubleshooting Your Common Problems
You may encounter some problems when migrating from BigCommerce to Shopify. Here are some of the most common problems and how to fix them.
Common Import Issues
Some products or customers not importing. If some of your products or customers failed to import, try adding them to your Shopify store manually.
Products are imported but fail to publish. If some of your imported products fail to show up on your Shopify store, there is a good chance that they have been set as hidden. In this case, try making them available to see if the problem is dealt with.
Product variants not importing. If your product variants fail to import, try adding them manually.
Payment issues
Payment gateway integration can be challenging during the migration process. Some payment methods may not be compatible with Shopify. To prevent this, make sure you manually set up your payment settings and test the checkout process before launching your store.
SEO Optimization
You cannot import SEO settings from BigCommerce to Shopify as they have different SEO tools and structures.
If you experience SEO issues after migrating to Shopify, you can manually recreate your SEO settings using Shopify’s built-in SEO tools. This can involve tasks like optimizing page titles, meta descriptions, and URLs.
BigCommerce to Shopify Migration: 5 Tips for a Successful Migration
There are a few tips to consider for a successful migration from BigCommerce to Shopify. They are as follows:
- Export data in the correct format: If you go for the manual migration method, it’s essential to export your data from BigCommerce in the right format provided by Shopify.
- Clean up your data before migrating: To ensure that your data is safe and sound during migration, it’s a good idea to clean it up. The process involves removing duplicate products, customer records or re-organizing product collections.
- Consider hiring a migration specialist: If you are not comfortable with handling the migration process on your own or do not want to rely on a third-party migration tool, you may want to consider outsourcing to a specialist. A migration expert can help ensure that your data is transferred accurately and efficiently over to the new platform.
- Plan for downtime: During the migration process, your online website may experience some downtime or disruptions. Therefore, it’s important to plan ahead and inform your customers about any expected downtime.
- Check your product images: Before migrating your images to your Shopify store, make sure that your product images are optimized for your Shopify store. Shopify allows images up to 4472 by 4472 pixels, with a file size of up to 20 megabytes.
Migrating from BigCommerce to Shopify: FAQs
Can I Migrate My Blog Content from BogCommerce to Shopify?
There is no built-in method for transferring your blog content from BigCommerce to Shopify. However, you can save your blog posts to Google Drive and then upload them to Shopify. Or, use a third-party migration tool with blogging transfer functionality.
What Happens to My Old BigCommerce Store After Migration?
After migration to Shopify, your old BigCommerce store will no longer be in use. However, your store data will still be stored in the BigCommerce system and can be retrieved or restored.
How Long Does It Take To Migrate From Bigcommerce To Shopify?
The time it takes to migrate from BigCommerce to Shopify depends on the amount of data you plan to transfer and the method you choose. Manual migration may take a few days, whereas a third-party tool can complete the process within hours.
How Much Does it Cost to Migrate from BigCommerce to Shopify?
The cost of migrating from BigCommerce to Shopify depends on several factors, including the amount of data you want to transfer and the migration method you go for.
Can I Migrate My Store’s Design Or Templates From Bigcommerce To Shopify?
Can I Migrate My Store’s Design Or Templates From Bigcommerce To Shopify?
Bottom Line
That concludes the process of migrating from BigCommerce to Shopify. With proper preparation and execution, migrating to Shopify can bring new opportunities and benefits to your online store.
Sam Nguyen is the CEO and founder of Avada Commerce, an e-commerce solution provider headquartered in Singapore. He is an expert on the Shopify e-commerce platform for online stores and retail point-of-sale systems. Sam loves talking about e-commerce and he aims to help over a million online businesses grow and thrive.
Related Post
Table of Contents