 Automation
- Before You Transfer: What You Should Prepare
- Domain Transfer Requirements.Technical PreparationsAccount Management StepsPrepare domain for transfer from Squarespace.Verify if your domain can be transferred to Shopify.Transfer The Domain From Squarespace to Shopify: A Step-by-Step Guide
- Step 1: Create a Shopify AccountStep 2: Log in to Your Squarespace AccountStep 3: Add the A recordStep 4: Connecting Your Domain to Your Shopify AccountStep 5: Prepare your domain for transferStep 6: Additional Verification For Your Shopify DomainIns and Outs When Transferring A Domain From Squarespace to Shopify
-
When Shopify store owners migrate from Squarespace to Shopify, transferring the domain is the one part they are nervous about. No one wants to risk downtime, lose SEO rankings, or deal with technical errors during the switch.
The good news: We can help Shopify store owners confidently transfer their domain from Squarespace without losing traffic or disrupting their business. Let’s explore right now!
Before You Transfer: What You Should Prepare
Domain Transfer Requirements.
Before you start transferring your domain, you have to prepare:
- Domain transfer from Squarespace may take up to 7 business days.
- Identify your domain’s registrar (Squarespace Domains LLC or Tucows) by checking “Who’s my domain provider?”
- The new provider will not honor free domain offers from Squarespace, and you may be charged.
- For domains ending in .de, .co.uk, .org.uk, or .uk, refer to specific transfer guides for unique requirements.
- Transferring your domain does not include the transfer of site hosting or cancellation of your Squarespace subscription; manage these separately post-transfer.
- If you have enabled DNSSEC on your domain, remove it in the advanced settings before initiating the transfer.
Technical Preparations
- Disable DNSSEC: If enabled, remove DNSSEC in your advanced domain settings before initiating transfer
- Back up DNS records: Save all custom DNS records, as you’ll need to manually add these to Shopify after transfer
- Update contact email: Verify your email address is current and not associated with the domain being transferred
- Prepare for email service changes: Note that email services tied to your domain may require reconfiguration
Account Management Steps
- Create a Shopify account: Set up your Shopify store before beginning the transfer process
- Keep Squarespace accessible: Remember that transferring your domain does not cancel your Squarespace subscription
- Document subdomains: Make note of any subdomains you’ve configured, as these will need to be recreated
- Plan for continued hosting: Understand that domain transfer doesn’t automatically move your website content
Prepare domain for transfer from Squarespace.
- Step 1: Log into your Squarespace account and navigate to Home -> Settings -> Domains.
- Step 2: Select the domain you wish to transfer.
Unlock the domain to receive the authorization code by unchecking the “Lock Domain” button.
Click on “Send Transfer Authentication Code” to have the unique code emailed to the admin contact.

- Step 3: Retrieve and copy the transfer key from your email.
Verify if your domain can be transferred to Shopify.
Ensure that your domain is an apex domain, for example, johns-apparel.com, as not all types of domains (such as .ca or .co.uk) are transferable to Shopify.
After the transfer, remember to reconfigure any subdomains you had set up previously.
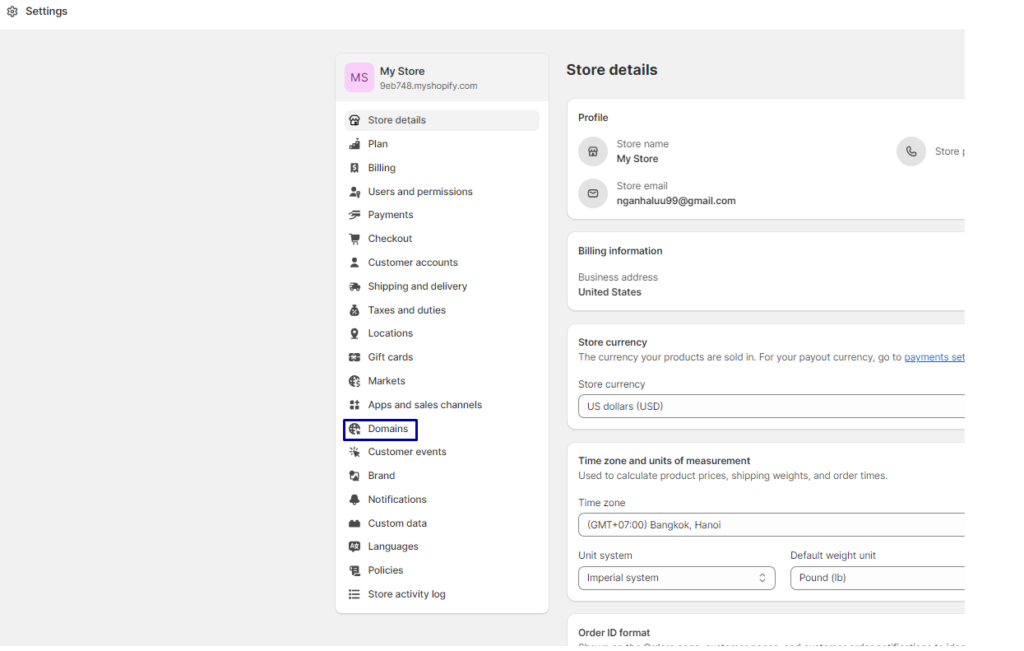
Step 1: Click Settings > Domains in your Shopify admin.
Step 2: Depending on your current setup:
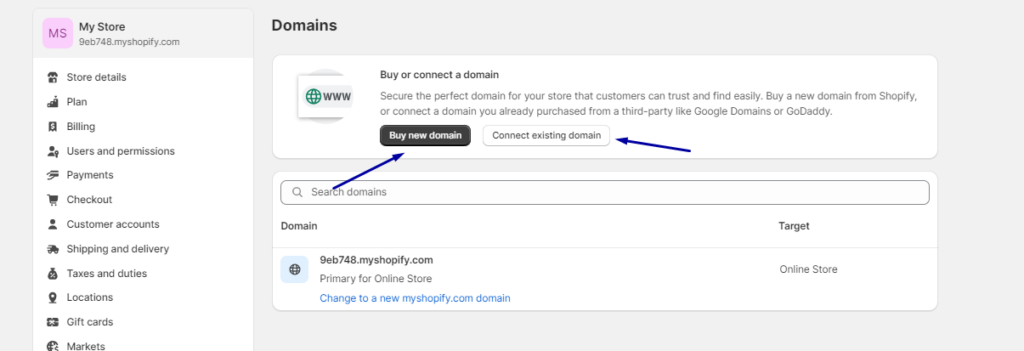
- If this is your first domain addition, select “Connect existing domain” and choose “Transfer it to Shopify.”
- If you have other domains connected, click on “Transfer domain.”
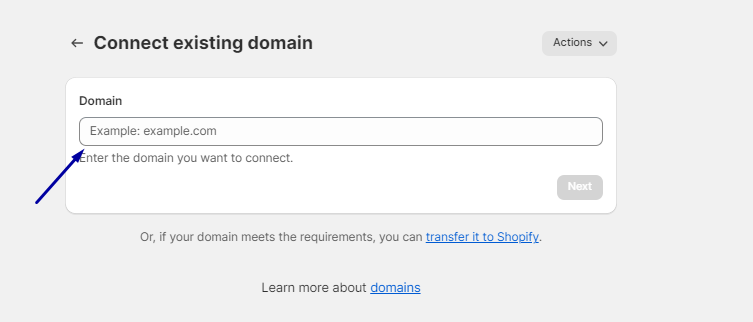
Step 3: In the “Transfer an existing domain” section, enter the domain you wish to transfer, excluding the “www.” prefix.
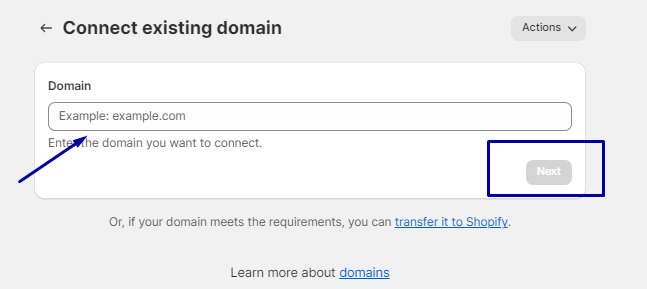
- Step 4: Click “Next.”
Step 5: Based on transfer eligibility:
If eligible, follow the provided instructions to finalize the domain transfer.
If ineligible, link your domain to Shopify using a third-party provider instead.
Related posts
Transfer The Domain From Squarespace to Shopify: A Step-by-Step Guide
Step 1: Create a Shopify Account
Before transferring your domain from Squarespace to Shopify, you need to set up a Shopify account. Although Shopify offers a free 3-day trial, which you can initiate at Shopify.com, adding a payment method is necessary to start selling. After naming your store and completing the initial setup, you must link your domain to Shopify to avoid any interruptions to your website during the domain transfer process.
Step 2: Log in to Your Squarespace Account
- Open a new browser tab and log in to your Squarespace account.
- Navigate to Account Dashboard > Domains, then select the domain you want to connect to Shopify.
- Click on the “DNS” option in the left sidebar.

- (Optional) If you have existing DNS records you want to keep (e.g., MX or TXT records), copy and save them in a document (Word, Google Docs, etc.) for future reference.
- Locate the existing Squarespace DNS records and click the trash can icon next to each one to delete them.

Step 3: Add the A record
- In the DNS Settings section, click the “ADD RECORD” button.

- Enter the following A record to your DNS settings:
- Host: @
- Type: A
- Priority: –
- Data: 23.227.38.65
- Choose the “Save” button.

Step 4: Connecting Your Domain to Your Shopify Account
Once you’ve acquired a domain from an external provider, it’s important to link it to your Shopify store. This linkage ensures customers are redirected to your Shopify storefront when entering your domain URL.
Remember, even after establishing this connection, domain settings, payments, and renewals will still be handled through your original domain provider.
Steps:
- Log into Shopify.
- Visit Settings > Domains.

- To connect an existing domain, click on “Connecting Existing Domain.” If this option isn’t immediately visible, go to “Actions” and choose “Connect Existing Domain.”

- Enter the domain name you connect.

- Select “Follow setting instructions” for customized Shopify help guides specific to your domain transfer process. The exact steps will vary based on your domain registrar, potentially involving adjustments to DNS settings or CNAME records to align with Shopify’s IP address or altering the A record to point your domain toward Shopify.
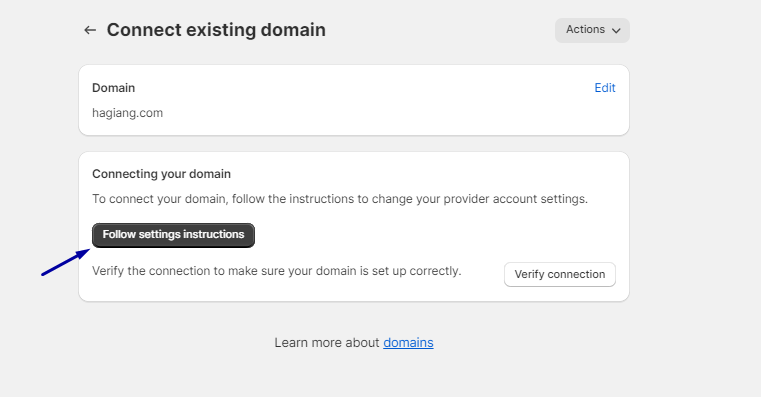
- Afterward, return to Shopify and select “Verify Connection” to confirm the link. Remember, this can take up to 48 hours.

Note: If the domain transfer fails after two days, revisit and verify each step to ensure accuracy in the domain settings. Should problems continue, seek assistance from your domain registrar.
Step 5: Prepare your domain for transfer
Begin transferring your domain to Shopify by unlocking it and receiving a transfer authorization code from your current domain provider. Once transferred, Shopify automatically updates your domain’s A and CNAME records to default settings. If your domain has additional records before the transfer, it’s advisable to save these so you can manually add them in Shopify’s Domain section.
Steps:
- Log into your account with the external domain provider.
- Verify that your email address is current and not associated with the domain you’re transferring.
- Save any necessary domain records for future use post-transfer.
- Select “Unlock” for the domain you intend to transfer and confirm the action if prompted via email.
- Choose options like “Transfer this domain” or “Transfer out” to receive a transfer authorization code.
Step 6: Additional Verification For Your Shopify Domain
As an additional security layer, your domain should require extra verification.
How to Add a TXT Record in Squarespace to Verify Your Domain with Shopify
- Log in to your Squarespace account, then go to Account Dashboard > Domains.
- Select the domain you’re connecting to Shopify, then click “DNS” in the left sidebar.
- Click “Add Record” to create a new DNS entry.
- In a new browser tab, log in to your Shopify admin.
- Go to Settings > Domains, then select the domain you’re trying to verify.
- Find the TXT verification value provided by Shopify and click Copy.
- Return to your Squarespace tab, and fill in the TXT record with the following details:
- Host: shopify_verification
- Type: TXT
- Priority: leave it blank or use – if required
- Data: Paste the TXT value you copied from Shopify
- Click “Save” to apply the changes.

- Go back to your Shopify Admin tab and click “Verify Connection” to complete the domain verification.

Ins and Outs When Transferring A Domain From Squarespace to Shopify
Transferring your domain from Squarespace to Shopify may seem like a technical process, but understanding the ins and outs can help you avoid common mistakes, save time, and maintain a smooth shopping experience for your customers.
The “Ins” – What You Should Do
- Unlock your domain in Squarespace to make it eligible for transfer.
- Request the transfer authentication code (EPP code) and keep it accessible.
- Confirm your domain registrar (e.g., Squarespace Domains LLC or Tucows) to check compatibility with Shopify.
- Verify your email address associated with the domain—this is where you’ll receive verification and approval requests.
- Backup DNS records like MX or TXT if you’re using custom email or verification services.
- Add and verify the domain in your Shopify admin panel before initiating the full transfer.
- Expect the process to take up to 7 days, and plan accordingly to avoid any disruption.
- Reconfigure subdomains or email forwarding once the domain is active in Shopify.
The “Outs” – Common Pitfalls to Avoid
- Don’t forget to disable DNSSEC before transferring, or your domain may be rejected.
- Avoid assuming your Squarespace hosting will be canceled automatically—this needs to be done manually after the transfer.
- Don’t lose track of your email inbox—missing the approval email can delay or cancel the transfer.
- Be cautious with domains that have country-specific extensions (like .uk, .de, etc.)—these may have special rules.
- Don’t skip the Shopify verification step—the transfer won’t complete unless you verify domain ownership.
- Don’t delete your Squarespace domain too early—wait until the transfer is confirmed in Shopify.
How to Cancel the Transfer Domain From Squarespace to Shopify
To cancel a domain transfer within the 5-day grace period, follow these steps:
- Look for an email from [email protected] in your inbox with the subject “New domain transfer request.”
- Open the email and click on ‘Review request.’
- Follow the on-screen instructions to cancel the domain transfer.
Note:
We will automatically proceed with the transfer if you do not respond to the email within the 5-day grace period. This initiates the transfer process once the grace period concludes. However, if you decide to retain your domain with us after the five days, you can still intervene by doing the following:
- Go to your Domains panel and select the domain in question.
- Enable the ‘Domain Lock’ toggle before you provide the transfer authentication code to the new provider.
Note: The transfer cannot be reversed through Squarespace once you send the authentication code to the new provider. However, you can cancel the transfer using the confirmation email received upon completing these steps. If you didn’t receive such an email, or if it doesn’t include a cancellation option, you should contact your new domain provider directly for assistance.
Transfer A Domain From Squarespace to Shopify: FAQs
How long does the transfer process take?
The transfer typically takes 5 to 7 days, starting when you enter the transfer code in Shopify.Will my website experience downtime during the transfer?
Generally, there should be no downtime if the domain settings are correctly configured. However, it’s advisable to plan for potential short periods of downtime just in case.Can I transfer any domain extension to Shopify?
Shopify supports most domain extensions, but checking Shopify’s documentation for any exceptions is good.What is a transfer authentication code, and where do I get it?
A transfer authentication code, an EPP code, or a transfer key is required to transfer your domain. You can get this from your Squarespace account under the domain settings.Do I need to unlock my domain before transferring?
Yes, you must unlock your domain in Squarespace’s domain settings before initiating the transfer.Bottom Line
Transferring a domain from Squarespace to Shopify is a straightforward process, typically taking about 5 to 7 days. It’s essential to ensure your domain is unlocked. You have the transfer authentication code from Squarespace, and be aware that you may need to reconfigure specific settings like email and subdomains on Shopify post-transfer.

Sam Nguyen is the CEO and founder of Avada Commerce, an e-commerce solution provider headquartered in Singapore. He is an expert on the Shopify e-commerce platform for online stores and retail point-of-sale systems. Sam loves talking about e-commerce and he aims to help over a million online businesses grow and thrive.


Related Post
-
Table of Contents
