Automation
- What is Shopify Hosted Payment SDK?How Shopify Hosted payment SDK works?How to Build Shopify Hosted Payment SDK
- Developing your hosted payment gateway integration using the Hosted Payment SimulatorAdding a gateway to your Shopify Partner’s account
Payment gateways can be considered as one of the most vital factors when it comes to building an online store. Nowadays, there are various payment gateways from third parties that you can integrate into your checkout page. However, with the Shopify platform, a payment gateway can be easily built just by using Shopify Hosted payment SDK.
If you are completely new to this subject or you are looking for more information on Shopify Hosted Payment SDK, then this writing on How to build a payment gateway using Shopify Hosted payment SDK is for you.
However, please kindly note that access to the Hosted Payment SDK is restricted, so you need to be granted first to build a payment gateway!
What is Shopify Hosted Payment SDK?
Shopify Hosted Payment SDK is a payment gateway designed and supported by the Shopify team to help connect your hosted payment page with all checkouts implemented on Shopify. All Hosted Payment SDK integrations are grounded in a full-page redirect on the final checkout step of the checkout flow. This offers a standardized interface for a lot of 3rd party payment gateways. By using predefined values, Shopify checkout will redirect visitors and customers to the payment page that you provide. After getting the payment done, they will be redirected back to the Shopify page where the order status is displayed.
How Shopify Hosted payment SDK works?
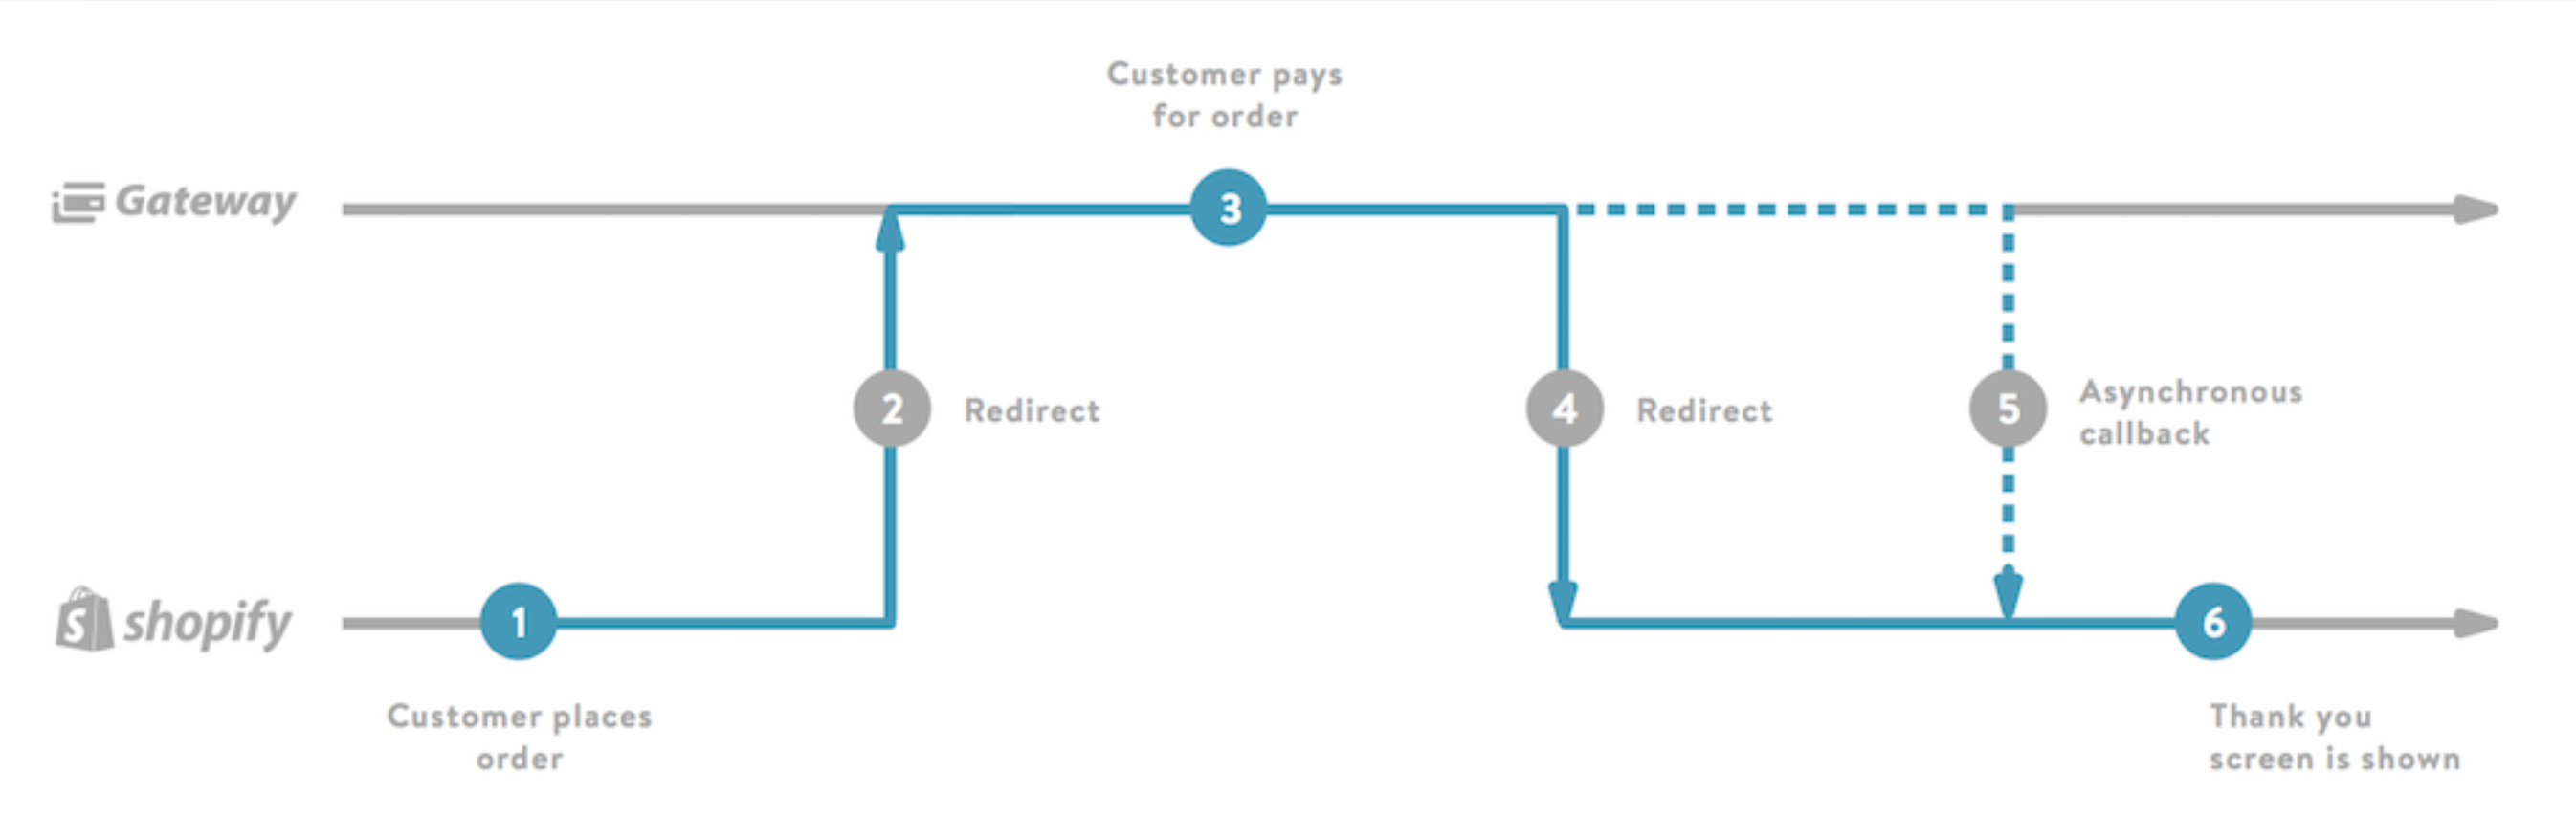
Working as a transaction – hosted payment page integrator, Hosted Payment SDK is employed in almost all steps of the checkout process, including 6 stages. Not all of them can be visually seen by customers.

Stage 1: In this stage, your customer places an order with Shopify Checkout. Their email, shipping address, and delivery method will be filled in. Then they have to select your gateway as a payment option.
Stage 2: After step 1, the customer will be redirected to the URL of your gateway using a post request. Your gateway’s job is to verify the
x_signaturevalue and presents its own hosted payment page to your customer.Stage 3: On the hosted payment page provided, the customer needs to pay for the order.
Stage 4: Customers who have got the payment flow done will be redirected back to
x_url_completewith required Response Values as query parameters, includingx_signature. Those who exit the payment flow before finishing it will be redirected back tox_url_cancel.Stage 5: It would be the best working method for your payment gateway to be in use to post a callback to
x_url_callbackwith the same Response Values. This is to make certain that all orders can be successfully completed even if the Shopify – customer connection is prematurely terminated. Please kindly note that all callbacks need to be in POST HTTP x-www-form-urlencoded format.Stage 6: Customers will be redirected to a thank-you page for completing an order. However, please note that:
HTTP 200 does indicate successful receipt of a Shopify callback. Otherwise, we recommend up to 5 retries together with an interval of 1 minute (at least)
Shopify will ignore duplicate requests.
How to Build Shopify Hosted Payment SDK
Developing your hosted payment gateway integration using the Hosted Payment Simulator
Here is how to run a transaction preview with the Hosted Payment Simulator:
Step 1: Add a payment gateway
Change your gateway’s Redirect URL to
https://offsite-gateway-sim.shopifycloud.com/or add a payment gateway.Step 2: Activate your payment gateway
Now you can see your gateway available in your development store, located under the drop-down list named Credit Cards or Alternative Gateways. Find and activate it with these credentials:
- Username – any non-empty value
- Password / HMAC Key – iU44RWxeik
This gateway will redirect your customers to
https://offsite-gateway-sim.shopifycloud.com/.Step 3: Complete-a-test-purchase
Try placing an order on your website. In case there is no product in your store, then it’s a must for you to add one before completing a purchase.
Adding a gateway to your Shopify Partner’s account
After completing your payment gateway’s development, now you can add it to your development store. Let’s take a look at those steps below:
Step 1: Login
Sign in to your Shopify Dashboard.
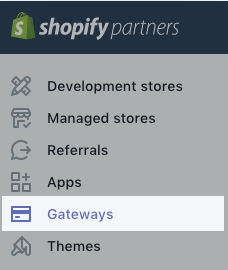
Step 2: Open Gateways
In the Shopify Dashboard, choose
Gatewayswhich is under the Apps section.Step 3: Create a Gateway
Next, choose
Create GatewayStep 4: Fill in required fields
Fill in these fields with your gateway’s information:
Gateway Name: It will be displayed in the merchant payment settings and on checkout pages as a payment option.
Gateway Website: This URL will be provided within the payment settings. Customers can also use it to review your service.
Gateway Logo: The logo will be displayed in the size of 24 x 220 pixels.
Gateway Category: Your gateway will be displayed under this category, within payment settings.
Login Label: Describes the sign-in credential types for the gateway like
Account NumberorUsername.Password Label: Describes passwords for the gateway like
Secret KeyorPassword.Redirect URL: Customers will be redirected to this address at checkout. All request values that will be sent must be handled by this URL.
Sandbox URL: You are allowed to send test transactions to this URL. This is optional.
Payment Types: Appears next to your logo at checkout.
Countries Served: Countries where merchant accounts are available and are supported.
Publishing your payment gateway
Publishing your payment gateway or requesting Shopify to list your gateway publicly for all shops in your supported countries comes with a condition: there are at least 50 Shopify stores using your gateway having processed 1 million USD in total at least or equivalent. If qualified, the gateway will be listed in Payment Settings and on the public list of gateways of Shopify.
If you want to make a requirement of listing your gateway, please contact Shopify Team with the information below:
- Subject line: Hosted Payment SDK – Public listing request
- Partner ID
- Gateway Name
- Description of your service
- A list of Shopify merchants using your gateway
- The total transaction volume they have processed
- Screenshots of the checkout process for both successful and failed payment attempts
- Setup steps for merchants in need of configuring your gateway with their store
Adding order management to your gateway
Capture Payments
Shopify will send the Request Values to your app whenever a merchant wants to capture a transaction in the Shopify admin, with the
x_transaction_typetocapture:Key Type Example x_transaction_typefixed choice capturePlease note that it’s a must to send back the Response Values with the
x_transaction_typeset toauthorization:Key Type Example x_transaction_typefixed choice authorizationThe way a manual capture works
- Step 1. First, in the Shopify admin, the merchant clicks the capture button on the checkout page.
- Step 2. Shopify sends a POST JSON request to your capture URL with the Request Values. However, kindly note that your server must reply with a 200 HTTP OK. If not, Shopify will automatically cancel the order.
- Step 3. Your server posts a callback to
x_url_callbackwith the Response Values.
How to set up manual capture
- Step 1. Sign in your account to the Partner Dashboard.
- Step 2. Choose Payment gateways.
- Step 3. Tap your payment gateway’s name.
- Step 4. Click Edit gateway settings on the page of your payment gateway.
- Step 5. Fill in the URL of your gateway’s capture endpoint in the Capture URL field in the Payment URLs section.
When a capture is made in the Shopify admin, the Request Values will be sent to your Capture URL by Shopify.
Refund Payments
Shopify will send the Request Values to your app whenever a merchant wants to capture a transaction in the Shopify admin, with the
x_transaction_typetorefund:Key Type Example x_transaction_typefixed choice refundPlease note that it’s a must to send back the Response Values with the
x_transaction_typeset torefund:Key Type Example x_transaction_typefixed choice refundThe way a refund works
- Step 1. First, in the Shopify admin, the merchant clicks the capture button on the checkout page.
- Step 2. Shopify sends a POST JSON request to your capture URL with the Request Values. However, kindly note that your server must reply with a 200 HTTP OK. If not, Shopify will automatically cancel the order.
- Step 3. Your server posts a callback to
x_url_callbackwith the Response Values.
How to set up refunds
- Step 1. Sign in your account to the Partner Dashboard.
- Step 2. Choose Payment gateways.
- Step 3. Tap your payment gateway’s name.
- Step 4. Click Edit gateway settings on the page of your payment gateway.
- Step 5. Fill in the URL of your gateway’s capture endpoint in the Capture URL field in the Payment URLs section.
When a capture is made in the Shopify admin, the Request Values will be sent to your Refund URL by Shopify.
Void Payments
Shopify will send the Request Values to your app whenever a merchant wants to capture a transaction in the Shopify admin, with the
x_transaction_typetovoid:Key Type Example x_transaction_typefixed choice voidPlease note that it’s a must to send back the Response Values with the
x_transaction_typeset torefund:Key Type Example x_transaction_typefixed choice refundThe way a refund works
- Step 1. First, in the Shopify admin, the merchant clicks the capture button on the checkout page.
- Step 2. Shopify sends a POST JSON request to your capture URL with the Request Values. However, kindly note that your server must reply with a 200 HTTP OK. If not, Shopify will automatically cancel the order.
- Step 3. Your server posts a callback to
x_url_callbackwith the Response Values.
How to set up refunds
- Step 1. Sign in your account to the Partner Dashboard.
- Step 2. Choose Payment gateways.
- Step 3. Tap your payment gateway’s name.
- Step 4. Click Edit gateway settings on the page of your payment gateway.
- Step 5. Fill in the URL of your gateway’s capture endpoint in the Capture URL field in the Payment URLs section.
When a capture is made in the Shopify admin, the Request Values will be sent to your Void URL by Shopify.
Hosted Payment SDK API Reference
The
x_Keys such asx_amountare given by the API Reference files. Those files can let you know whether they require values or not. Also, they have short descriptions to provide the whole context.Request Values
Key Type Example x_account_idRequired. Note that This is an account identifier assigned to the merchant by the payment processor.Unicode string T6xhZPtunDh8 x_amountRequired.decimal 20.99 x_currencyRequired.iso-4217 GBP x_referenceRequired. Note that Unique reference of an order assigned by the merchant.ASCII string 35672 x_shop_countryRequired.iso-3166-1alpha-2 UK x_shop_nameRequired.Unicode string Labor Inc. x_signatureRequired. Note that Look for more info about Signing mechanism.hex string, case-insensitive 98ab8779245adcb87259 x_testRequired. Note that Indicates whether or not this request should be processed in test mode (if supported).true/false true x_url_callbackRequired. Note that URL to which a callback notification should be asynchronously sent.URL https://myshopify.io/ping/1 x_url_cancelRequired. Note that URL to which customers must be redirected when they wish to quit payment flow and return to the merchant’s site.URL https://myshopify.io x_url_completeRequired. Note that URL to which customer must be redirected upon successfully completing payment flow.URL https://myshopify.io/orders/1/done x_transaction_typeNote that You’ll only get this value if you’re using order management. The valid values arecapture,refund,void.fixed choice capture x_customer_billing_address1Unicode string 241 Dagmar Ave x_customer_billing_address2Unicode string x_customer_billing_cityUnicode string Ottawa x_customer_billing_companyUnicode string Shopify x_customer_billing_countryiso-3166-1 alpha-2 CA x_customer_billing_phoneUnicode string +1-613-987-6543 x_customer_billing_stateUnicode string ON x_customer_billing_zipUnicode string M5T 3A8 x_customer_emailUnicode string [email protected] x_customer_first_nameUnicode string Chris x_customer_last_nameUnicode string Noland x_customer_phoneUnicode string +1-613-987-6543 x_customer_shipping_address1Unicode string 241 Dagmar Ave x_customer_shipping_address2Unicode string x_customer_shipping_cityUnicode string Toronto x_customer_shipping_companyUnicode string Shopify x_customer_shipping_countryiso-3166-1 alpha-2 CA x_customer_shipping_first_nameUnicode string Chris x_customer_shipping_last_nameUnicode string Noland x_customer_shipping_phoneUnicode string +1-416-123-4567 x_customer_shipping_stateUnicode string ON x_customer_shipping_zipUnicode string N2T 3A8 x_descriptionUnicode string Orrder #111 x_invoiceUnicode string #111 x_shopify_order_idNote that The unique identifier of the order the request originated from. This will only be present in order management requests.integer 259791074 Response Values
Key Type Example Note X_account_idRequired.Unicode string T6xhZPtunDh8 Echo request’s x_account_idx_amountRequired.decimal 20.99 Echo request’s x_amountx_currencyRequired.iso-4217 USD Echo request’s x_currencyX_gateway_referenceRequired.Unicode string 241 A unique reference for every response issued by the payment processor. x_referenceRequired.ASCII string 78453 Echo request’s x_referencex_resultRequired.fixed choice completed Valid values are completed,failed, orpending.X_signatureRequired.hex string, case-insensitive ab682470175683bc89274d or g08497a68265e947be9275 or 0252g12479ea2580c82057 Look for more info about Signing mechanism. x_testRequired.true/false true Echo request’s x_testx_timestampRequired.iso-8601 in UTC 2014-03-24T12:15:41Z Time of transaction completion. UTC Time: YYYY-MM-DDTHH:MM:SSZ x_messageASCII string The billing address could not be verified. A custom error message presented to customers. x_transaction_typefixed choice authorization If you are using order management, then the valid values are authorization, void, and refund. sale If you are not using order management, then this field will use the default value sale. Some Error & FAQ for Hosted Payment SDK
Errors
- 422 Unprocessable Entity: Notification acknowledgment failed when sending the response
You will meet this kind of error when an invalid
x_signatureparameter is being sent in the response. Even there is a problem with the way to calculate the signature or the merchant has put in the wrong credentials in their store’s Payment settings or both of them, you can employ the Signature Calculator Tool to verify that your signature calculation mechanism is working on the right track.- **Error “422 Unprocessable Entity: Unable to find checkout with id “**
It’s a must to make sure that the
x_referencevalue you are supplying does match the checkout ID created by Shopify. Thex_referencevalue that was sent in the request’s parameters will be similar to this value.FAQ
- Can I make changes to the Order ID on Shopify?
No. In fact, order IDs are created in sequence by Shopify. They’re not changeable.
- Can I generate an order with Pending payment status and then change it to Paid later when goods are ready to be delivered?
You are allowed to provide an
x_resultvalue ofpendingwhen sending the initial notification tox_url_callback. If you want to change the order’s status to Paid, you can send another notification tox_url_callbacklater with anx_resultvalue ofcompleted.- I am receiving empty order management requests, why?
The parameters of payment requests to your integration are stored in the URL as query string parameters. Yet the parameters of order management requests are stored within the request body instead. Please make sure that your gateway has read the request body when it processes order management requests.
Conclusion
Thank you for reading! Hope our article on how to use Shopify Hosted payment SDK to build a Payment Gateway will provide a detailed guide to assist you in setting up your own payment gateway.
For your information about Hosted Payments Signature Calculator, Shopify API Developer Forums, and Sample Hosted Payments Project, if you have no idea whether your signature is correct or not, the Hosted Payments Signature Calculator will help. Similarly, The Hosted Payment Simulator will enable you to simulate the redirects and callbacks required to have integration. Also, you can connect with the community and look for more information about App development and Shopify API with Shopify API Developer Forums.
Related Posts:
Sam Nguyen is the CEO and founder of Avada Commerce, an e-commerce solution provider headquartered in Singapore. He is an expert on the Shopify e-commerce platform for online stores and retail point-of-sale systems. Sam loves talking about e-commerce and he aims to help over a million online businesses grow and thrive.
Related Post
Table of Contents